The Science Behind: creating a sourdough starter

DSC02785

If you’ve eaten bread at a sandwich shop before, you know that sourdough is a tasty bread option.  You might even know that sourdough is made with an active starter.  But ‘sourdough’ bread is not where sourdough stops.

In this edition of “The Science Behind,” we’ll discuss:

  1. What is sourdough starter and how does it differ from regular yeast?
  2. Why is lactobacilli so important?
  3. What can I use it for?
  4. How do I acquire a sourdough starter?

I hope you’ll learn not to be scared of sourdough starter – it’s a tool for bakers, not a burden or hindrance!   And it will transform your bread, I promise.

  1. First off, what is a sourdough starter?

Wait – back up.  Actual first off: what is commercial yeast?  Yeast that you buy in the grocery store is a strain of yeast called Saccharomyces Cerevisiae that’s been dried up and broken into little pieces.  By adding water and flour, you wake it up and give it a food source.  Yeast like to eat the sugars that are created when enzymes break down the starches in the flour.

2abcc-yeast

As the yeast eat the sugars, they release carbon dioxide and ethyl alcohol.  The carbon dioxide bubbles are trapped by the gluten net and rise your dough.  The ethyl alcohol provides a little acid that ferments your dough and gives it a nice, complex flavor.

Now, what makes sourdough starter different from commercial yeast?

Commercial yeast is a single strain of yeast. That’s it. Sourdough starter, in contrast, is a combination of a few different strains of wild yeast as well as a few different strains of lactobacilli, an acid-loving bacteria.  Both feed on different sugars from flour. As the yeast strains eat the sugars they like, they release ethyl alcohol.  As the bacteria consume the sugars they like, they release lactic acid.  This means the dough is slightly more acidic than it would be if it relied solely on commercial yeast.  This acid gives sourdough breads their stereotypical tang, although I should note that not all sourdough starters create tangy bread.

What contributes to the sourdough taste?

Different wild yeast and lactobacilli strains are responsible for the different flavors you might coax out of your breads using a particular starter.  Different locations have different strains of wild yeast in the air.

This post from the Encyclopedia Brittanica website explains: “The yeast-bacteria combination that emerges to dominate the starter is largely a function of temperature and nutrient availability. In the case of yeast, the ability to tolerate an acidic environment is especially important.  Continuous yeast and bacterial growth between 20 and 30 °C, in which wild yeasts populate the starter, is often dominated by L. sanfranciscensis bacteria. Other sourdoughs, particularly those made using industrial processes, involve the addition of baker’s yeast (Saccharomyces cerevisiae) and are typically maintained at temperatures above 30 °C. Although L. sanfranciscensis sometimes grows in this type of sourdough, other strains frequently emerge.”

What this means is that, if you want a more acidic starter, you need to keep your starter in a warmish environment, about 68-86 degrees F.  For a more milder taste, keep it at a warmer environment, above 86 degrees but no warmer than 140 degrees (after which yeast die).

f7c1d-baking2b3

How frequently you feed your starter also determines if your starter will have a stronger or more mild taste, since the acidity build up over time as the yeast eat more and more of the sugars in the flour.  But more on that in another post.

2. Why is lactobacilli so important? 

As I’ve said before, sourdough starter is made up of wild strains of yeast and lactobacilli bacteria.  Each have a type of sugar that they like to feast on, and both produce an acidic waste product that contributes to a more acidic PH level in the dough. Enzymes (amylases) in the flour help break down the starches present in flour into sugars to make them more available to the yeast and bacteria.  But if too much starch is broken down into sugars, it can impact the structure of your dough, making it too gummy.

85df6-dscn1450

Enzymes slow down if their environment is too acidic.  By creating a more acidic environment, the wild yeasts and lactobacilli regulate enzyme activity and slow it down so all the starch isn’t broken up.  This is particularly important in breads made with flour that is high in amylase enzymes, like whole wheat and rye.

  • By eating more different types of available sugars, sourdough starters create a bread with a lower glycemic index than breads made with commercial yeasts.
  • By creating a more acidic environment, they regulate enzyme activity in the bread.
  • The acidic environment produces benefits after baking as well: the higher acidity retards the growth of mold and other bacteria on your finished loaf.

3. What can I use sourdough starter for? 

Sourdough starter is great in almost any baked goods, whether to give them a little tang or for leavening purposes.

For tang: waffles, pancakes, quick breads, muffins, tortillas!  In breads that use baking soda, the sourdough starter replaces the acid in the buttermilk.

The Perfect Loaf

King Arthur Flour

Cultures for health

For leavening: you can use starter in any bread that calls for yeast, although if you have a tangy starter you might not want to use it in sweet or rich doughs where the sour taste will be off-putting.  Since starters take longer than commercial yeasts to leaven dough, you also want to make sure to add it to a bread that can take longer to rise than most typical enriched doughs with eggs and milk.

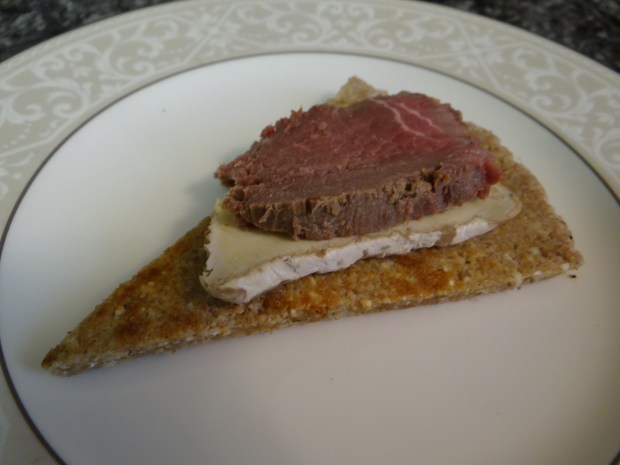
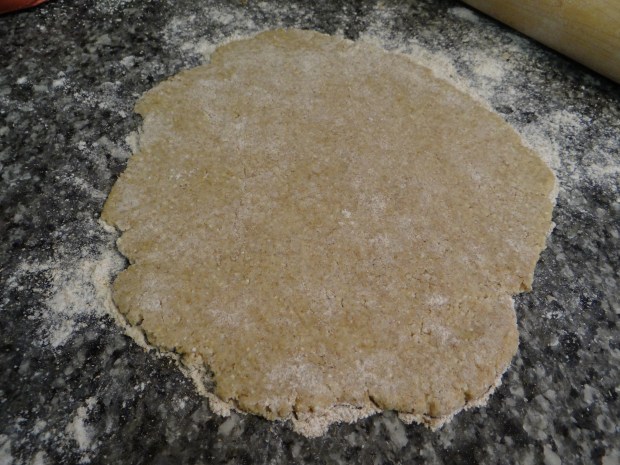
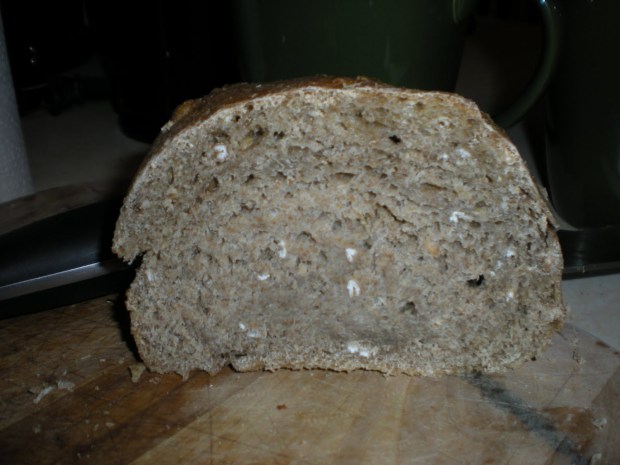
Where sourdough starter really shines is in rye breads, which have high amylase enzyme activity and low gluten.  The starter regulates the amylase enzymes and vastly improves the bread’s texture.  The transformation is truly amazing.

DSC03215

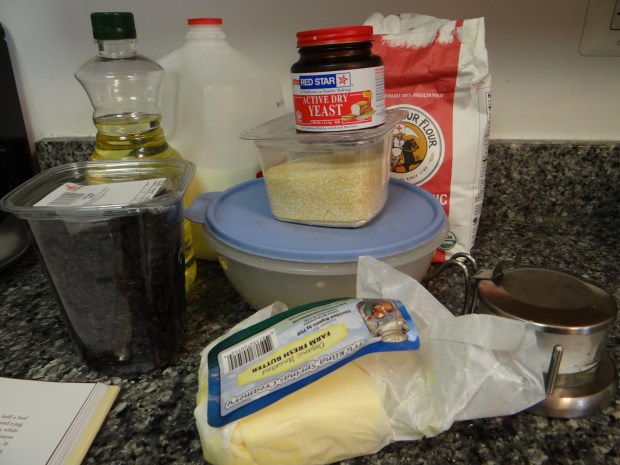
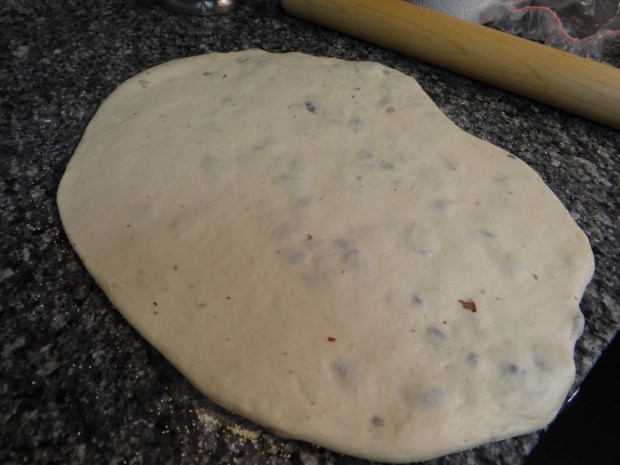
this bread is 50% rye, 50% AP flour.  It doesn’t even look like rye bread, it’s so light and airy thanks to the sourdough starter.

4. How do I acquire a sourdough starter?

The easiest way to get a sourdough starter of your own is the find someone who has an active starter already and ask them to give you some.  They are unlikely to refuse, since starters must be dumped out or used up and refreshed frequently.

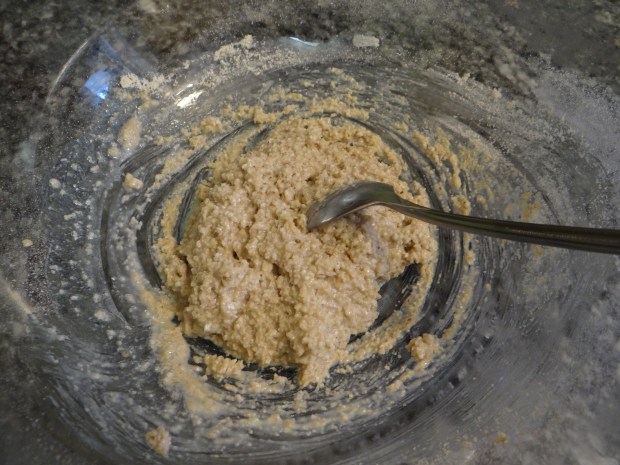
The next easiest way is to make it yourself.  You could just make a slurry of water and flour, about 75-85% hydration, and leave it uncovered overnight.  Don’t make it too big- I’m talking 75g of flour and 60g of water each feeding.  Dump half of it out and feed it twice a day until you start seeing activity.  Some sourdough aficionados even use apple or pineapple juice to get things going more quickly, providing a food source but increasing the acidity to ward off bad bacteria.8504b-bread2betc-2b002

Don’t forget to continue discarding most of your starter.  This is super, super important!b1283-dscn4055

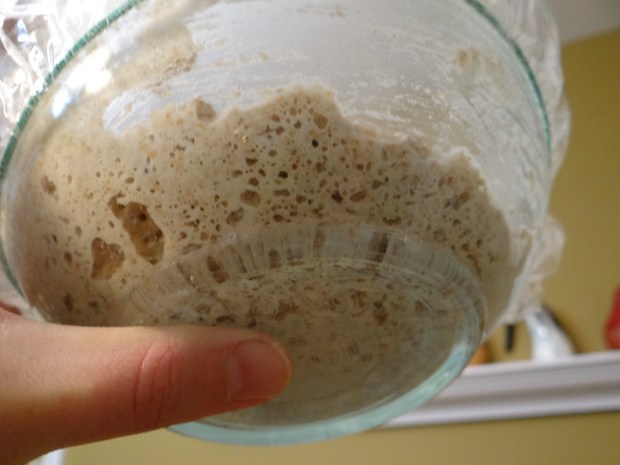
Creating a starter can take 1-2 weeks before you see enough activity to rise a loaf of dough.  If you don’t see any activity after two weeks, throw it out and start over.493ec-starters

Once your starter is lively, you can begin baking with it.  My favorite basic sourdough recipe is my 1-2-3 sourdough:

1-2-3 Sourdough

125g of active sourdough starter

250g of water

375g of flour

7-10g salt

Get it?  It’s called 1-2-3 bread because it’s 1 part (by weight) starter, 2 parts water, and 3 parts flour.

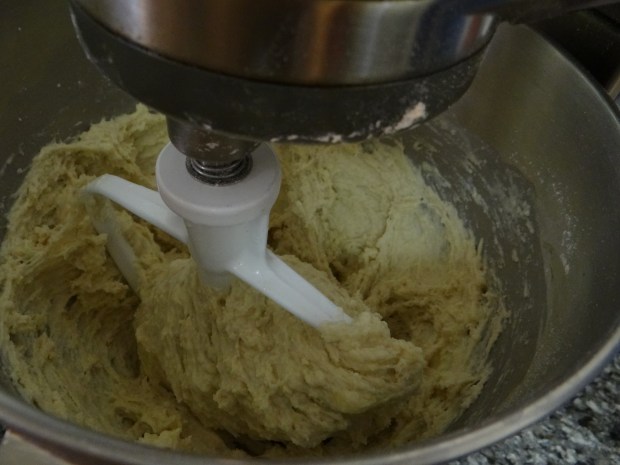
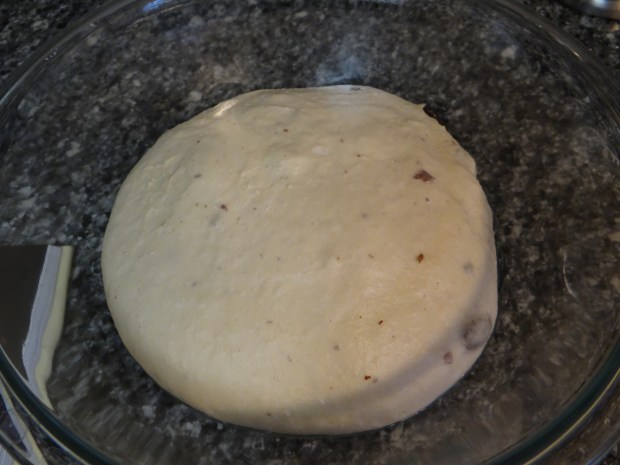
  1. Mix up all the ingredients and let rise overnight or for 12 hours.  Depending on how warm your kitchen is, this might take more or less time.  In the heat of summer, this bread has finished rising in five hours.
  2. Punch it down and shape it into a boule.  Place in a couche seam-side up or on a piece of parchment seam-side down for about an hour while you preheat the oven to 500 degrees F with your dutch oven inside.
  3. Bake with the dutch oven lid on for 15 minutes at 500 degrees F, then knock it down to 375 degrees F for the second 15 minutes, then remove the lid and continue baking a third 15 minutes at 375 degrees F.
  4. Remove your finished loaf and let cool completely, or at least 30 minutes, before slicing.

Now that you’ve got active starter, check out how to maintain it here.

http://www.perten.com/Products/Falling-Number/Applications/Flour-milling-and-baking/

http://blogs.britannica.com/2010/01/sourdough-bread-a-delicious-mix-of-harmonious-microbes/

Some thoughts on competing in the Arlington County Fair bake-off, Part II

IMG_5068

You can find Part I here.

When I pulled my breads out of the oven on Wednesday night, I was really pleased.  They looked awesome.  I let them cool overnight.

The next morning I woke up and prepared the breads for submission.  They were required to be on white paper plates, and I wrapped the whole thing in large bread bags.  Then I woke up the Little Bread Dudes and we jumped in the car and headed to the Fair venue.

IMG_5042

How cute are my dudes?  LBD #1 was really excited about the competition.  We had lots of good conversations about trying your best.

All day Thursday I kept checking the website to see if they announced the winners or that judging was done. Ugh, why was I so nervous? They said they would call the winners that day, but since they didn’t call I knew I hadn’t won any of the big prizes.

On Friday we went to the Fair as a family and I was able to check and see what the results were.

IMG_5066

My pesto cheese swirl bread in the corner with the second premium ribbon.

A word about how the awards system works:  the competitive exhibits are divided (from highest to lowest) into departments, then divisions, then sections, then classes.

IMG_5061.JPG

I forgot to mention: I also submitted a country white bread that was disqualified because I didn’t read the rules carefully enough. Oops!

Anyway, so the Department was 2) Decorated Food Products and Baked Goods.  The Division was G) Adult.  The Section was C) Baked Goods, and the Class was 307) Breads.

So within a class, a first premium and second premium award is given.  All first premium awardees then are eligible to compete at the section level, where champion and reserve champion awards are given.  Champion awardees are eligible to compete at the Department level, where Grand Champion and Reserve Grand Champion are the highest possible awards at the Fair.

So it goes:

Department – Grand champion and reserve grand champion

^

Section – champion and reserve champion

^

Class – first and second premium

Got it?

So I won second place in my class.  Maybe next year I’ll have better luck with my sourdough rye.

Here’s my award-winning pesto cheese swirl bread:

IMG_5058

Here’s my poor disqualified Country White Bread 😦

IMG_5060

Which they still managed to sample, ha ha!

Here is the winner of the 307) Bread class:

IMG_5062

The flour on top in the shape of a rosemary sprig is a nice touch, I have to admit.

The same baker who made this country loaf with garlic and rosemary also made the Department 2) Decorated Food Products and Baked Goods Grand Champion winner, pepperoni rolls:

IMG_5063

Besides the award itself, the thing I really like about the judging is that the judges write their comments on the back of the tag.  Last time the judges felt I didn’t bake the breads long enough, so they were a little undercooked in the middle.  This time I made sure that was not the case!

Here’s what they had to say about my pesto cheese bread:

IMG_5059

I’m almost prouder of this feedback than I am of the second place ribbon 🙂  It WAS a damn good presentation and they WERE excellent flavors, weren’t they?

Another thing I enjoyed was friends going to the Fair who reported back to me that they visited my bread and saw it in person!  I love you guys.

I’m also really glad I didn’t enter the chocolate babka I had originally thought of, because it would be in competition with this one and MAN that is one fine-looking chocolate babka. How did they even make that double swirl?  Amazing.

IMG_5065

not my babka

I don’t really have anything else to say except perhaps that, after four intense days of dumping and feeding, my starter has recovered from its proteolytic state.  Hurray!  I’ve made three loaves of sourdough and they’ve turned out perfectly, and the nice yeasty aroma of healthy starter has returned.

IMG_5049


Some thoughts on competing in the Arlington County Fair bake-off, Part I

IMG_5030
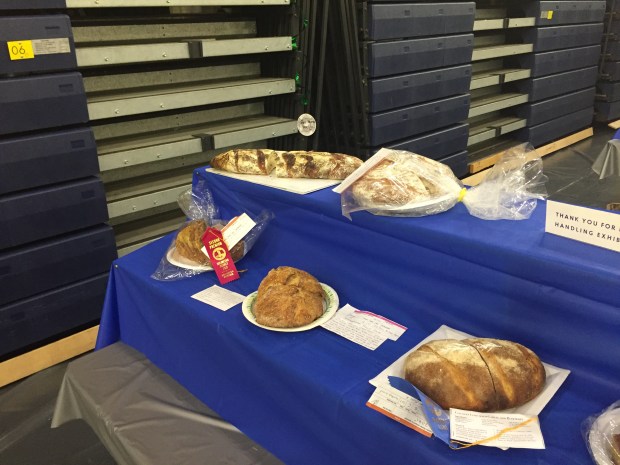
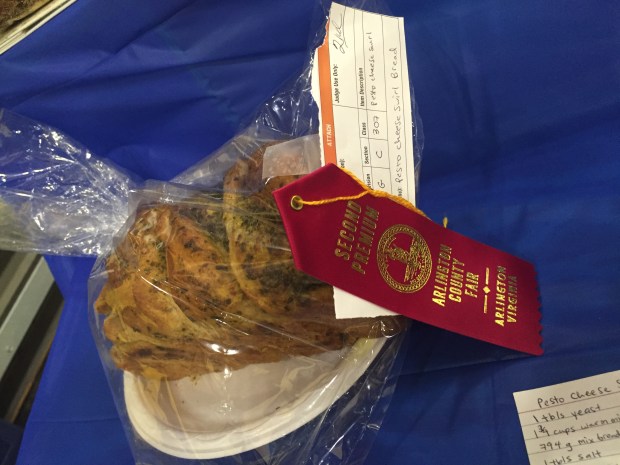
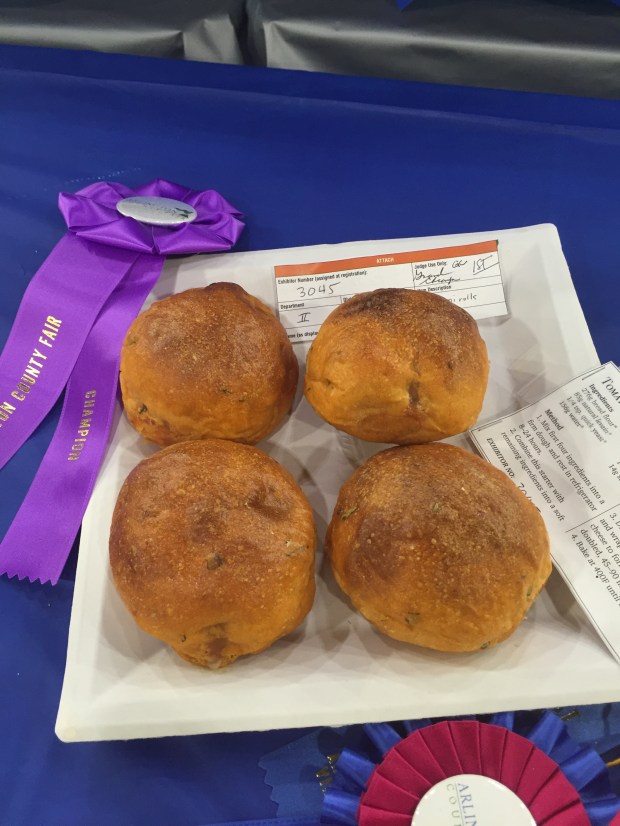
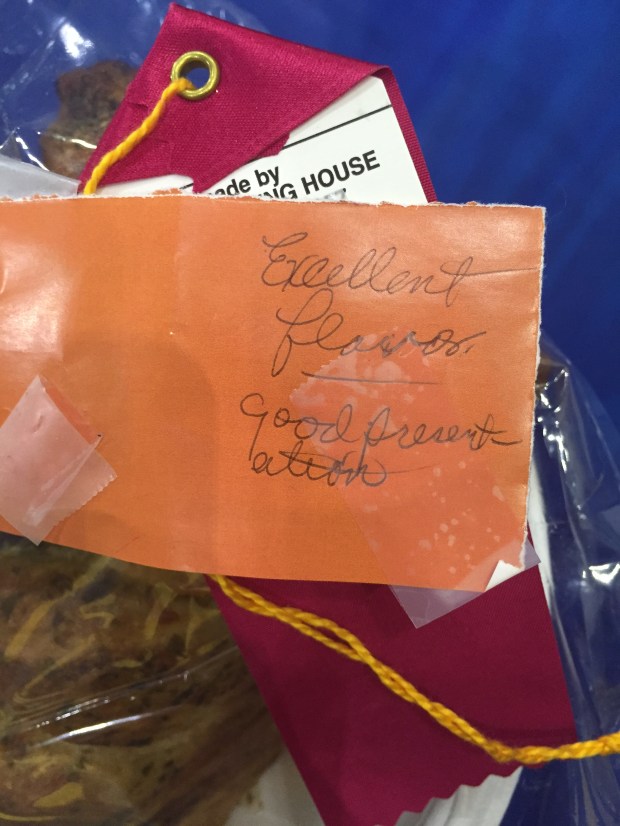
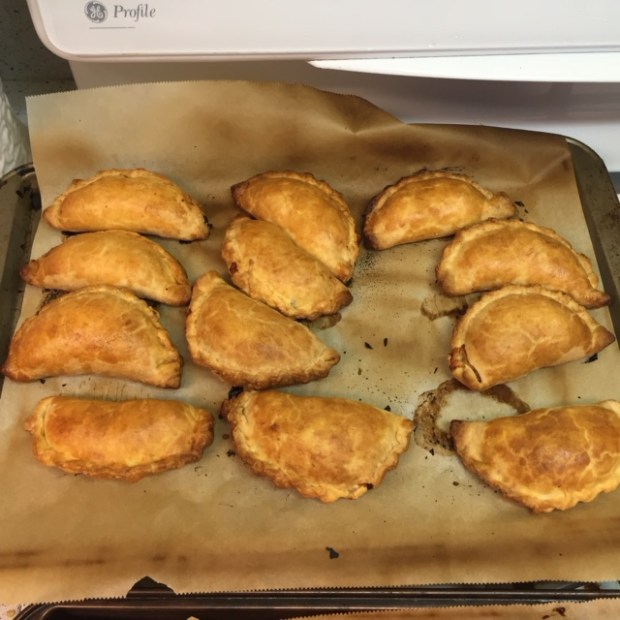
Last week, I entered my breads in the Arlington County Fair bake-off.
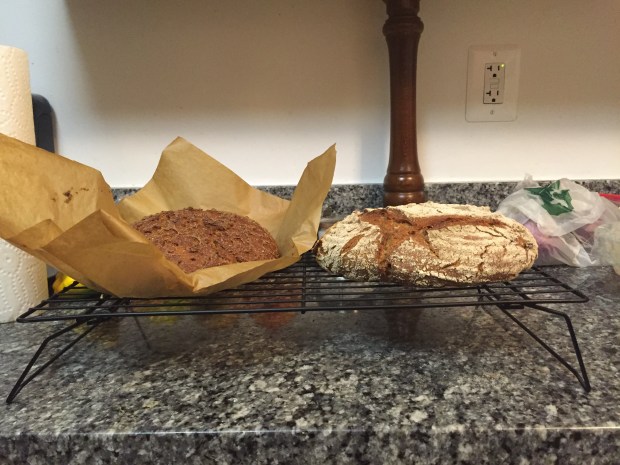
I hadn’t submitted anything to the bake-off in five years (read about my last bake-off here), because the submission timing is a little wonky.  Judging is on Thursday from 9am-2pm.  You can bring your baked goods either Wednesday night, which means they get to sit out all night, losing their crispy crust, or you can stay up all night to bake fresh bread and bring them early Thursday morning.  There’s really no good option that maximizes sleep and tastiness.  And I’m all about maximizing sleep.

Luckily, my rye sourdough breads do best when they’re baked the night before and given a chance to cool completely and continue to develop flavors.    I wasn’t thrilled about wrangling two Little Bread Dudes to drive across town and deliver the breads at 7am, but what’re you gonna do?

IMG_5042

Little Bread Dudes rising and shining to submit bread entries on Thursday morning

I was very excited about my chances this year.  I knew the judges would be blown away by the rye sourdoughs.  So on Monday, I took out my sourdough starter from the fridge, scooped out and threw away most of it leaving about a tablespoon of starter, and fed it some flour and water.  It smelled like nail polish remover, but I was hoping that was just the hooch, or lactic acid, that had separated a little from the rest of the starter.

IMG_5049

The next day, Tuesday, it still smelled like nail polish remover (it should have a very mild smell, or none at all) and was very gloopy.  When I say gloopy, I mean if you scooped some up with a spoon, it would quickly flow over the sides in long wet ribbons rather than sticking to itself.  I really hoped the starter had not turned proteolytic, because that spells disaster for bread (more on that in a second).

Hoping against hope, I threw some starter into my bread dough and prayed it would work out.

It did not.

IMG_5024

See the breads above?  They started out with very nice gluten formation when I mixed them up.   But the starter, instead of eating the sugars in the dough, attacked the gluten instead.  By the time it was time to bake, the dough was a gloopy mess.  The dough did not stick to itself, as well-formed doughs should.  When they got into the oven, they just collapsed and became dense hockey pucks.  I let them cool, then threw them out.

The starter was indeed proteolytic.  Hang on, let me explain.  A sourdough starter is made up of wild yeasts and lots of different bacteria that are gathered from the air.  Lactic acid, also present in sourdough starter, keeps the acidity of the starter high enough to kill most of the dangerous bacteria.  Different bacteria need different food sources to survive and reproduce.  The bacteria that we like eats sugars in the wheat flour.  But there are other kinds that eat gluten protein.  As long as you feed your starter frequently, the sugar-eating bacteria will make up the majority of your starter.  But if you go too long without feeding your starter, the bacteria that eat the sugars run out of food and many of them die off.  Meanwhile, the bacteria that like eating gluten take over and thrive.  A starter that has an overabundance of gluten-eating bacteria is called proteolytic.  The Fresh Loaf has a good explanation here.

I used to think there was nothing I could do if my starter became proteolytic.  DSC02335.JPG

But now I know there’s a way to revive the starter – it just takes between 4-7 days on an intensive, twice a day dumping-and-feeding schedule.

I had 2 days.  I knew there was no chance that my starter would be recovered enough to submit my beloved rye sourdoughs for the Fair.  I needed to come up with another plan.

The basil in our garden has been very successful this year, and I’ve been able to make lots of pesto.  I thought I could take my chocolate babka recipe and tweak it to make a ‘pesto babka.’  Also, why not add cheese?  Everyone loves cheese.

So that’s what I did.  I downloaded the Fair competitive exhibits forms and spent my Wednesday evening making pesto cheese bread.

IMG_5071[1]

The Bread Maiden’s pesto cheese bread (makes 2 loaves)

1 tablespoon instant or active dry yeast

1 3/4 cups warm milk

794g mix AP/whole wheat flour

1 tablespoon salt

2 tablespoons honey

6 tablespoons melted butter

2 eggs (one for the bread, one for the egg wash)

1/4 cup pesto

1/4 cup Italian 6-cheese shredded cheese mix (or other shredded melty cheese)

  1. Mix all ingredients and one of the eggs together in a large bowl.
  2. Knead until smooth, about five minutes.
  3. Cover with plastic wrap and let rise 3-4 hours.
  4. Punch down and divide your dough into 2 loaves.
  5. Using a rolling pin, roll out your dough until it’s about 1/2 inch thick.  Spread 1/2 of the pesto mixture, avoiding 1 inch around the edge.  Fold the right and left sides in about 2 inches, then, starting with the bottom edge (the one closest to you), carefully roll up your dough tightly.  Keep your top 1-inch edge free of pesto.  Once your dough is all rolled up, pinch the seam together.
  6. Now, using a bench scraper or a knife, cut your dough straight down the middle.  Ugh- this is hard to explain without pictures.  Check out Smitten Kitchen’s kranz-cake-style chocolate babka here for a better idea of what I’m talking about.  Basically, you divide the roll straight down the middle, then twist the two pieces together to make it look really cool on top.  Sadly, this does mean you sacrifice the internal swirl.
  7. Move your swirly dough to a buttered bread pan and repeat steps 5-7 with the other lump of dough.
  8. Cover your doughs with plastic wrap and let them rise for another hour.
  9. Preheat the oven to 350 degrees F.  Whisk together your egg with a teaspoon of water, then brush over the top of your loaves.  Bake for 40 minutes until golden brown.


Click here for part II, the actual bake-off!


Baking with Kids: Spiced zucchini muffins

DSC03478

Wait, what?  You might be asking.  I thought you’ve blogged about these zucchini muffins before.

The answer is: yes. I have.  But I also try to highlight recipes that kids like to help with and like to eat.  These zucchini muffins fit the bill.

DSC01922.JPG

A good candidate for a kid-friendly recipe is one that doesn’t require lots of technique, exact timing, or precision to work, and has lots of different things to measure but not a lot of chopping (unless you’re working with an older kid).  Also, the recipe should be able to be finished in a single evening, in under an hour.

DSC03505

For about 12 full-size muffins and 12 mini muffins (about 3 cups of batter), you will need:

DSC01901.JPG

Dry Ingredients:
5.75 oz Whole Wheat Flour
2 oz wheat germ
1/4 teaspoon salt
1/2 teaspoon baking soda
1 1/4 teaspoon baking powder
2 teaspoons ground cinnamon
1 teaspoon ground or fresh nutmeg
1/2 cup brown sugar
Wet Ingredients:
1/2 cup milk
1 egg
2-4 tablespoons olive oil
2 tablespoons maple syrup or honey
2 grated summer squash or zucchini, about 1 1/3 cups grated
1 tablespoon vanilla extract
Butter for greasing the muffin pan

Preheat your oven to 425 degrees F.  Line a cupcake pan with liners or grease with butter.

DSC03509

Mix together your dry ingredients.  Little Bread Dude tried grating the nutmeg this time.

DSC03508

If you don’t have brown sugar handy, use a fork to mix about a teaspoon of molasses into white sugar.  LBD also worked on this.

DSC03510DSC03511DSC03512

Then grate your squash or zucchini into a bowl.  Wrap in a tea towel, then twist it to release all the water over the sink.

DSC03513

DSC01910

Add the other wet ingredients and stir to combine.  Then add to the dry ingredients.

DSC01912

I needed to add a bit more oil, since my batter was dry.  You might be asking, “if they were dry, why did you squeeze out all the water from the squash?”  That’s a good question.  There’s a difference between water and oil.  Water adds hydration.  When water and flour mix, they create gluten proteins which makes a chewy, rubbery muffin.  Eggs also have gluten, which is why we aren’t adding an extra egg to combat the dry batter either.  Instead, we are adding oil, which provides necessary liquid and softens the batter without making your muffins rubbery.  Got it?

Now, scoop the batter into your muffin pans and bake for 10 minutes for the mini muffins and 15 minutes for the regular muffins.

DSC01914.JPG

DSC01915.JPG

How cute are these?

DSC01918.JPG

LBD has been eating the regular muffins for breakfast and his brother has been eating the mini muffins.  Score!

All the recipes I made from the Outlander Kitchen Cookbook

DSC03401

A Bread Library Book Review: Outlander Kitchen

DSC03501

Raisin muffins

DSC03483

Mrs. Bug’s buttermilk drop biscuits

DSC03475

Stephen Bonnet’s salted chocolate pretzel balls

DSC03450

Sarah Woolam’s Scotch Pies

DSC03442

Jocasta’s Auld Country Bannocks

IMG_4954

Brianna’s bridies

IMG_4976

honey-buttermilk oatbread

IMG_4919

Short crust pastry

DSC03399

Chocolate biscuits (cookies)

DSC03387

Pumpkin seed and herb oatcakes

DSC03368

Brown buns at Beauly

DSC03349

Bannocks at Carfax Close

DSC03338

Fiona’s cinnamon scones

DSC03323

Mrs. Graham’s Oatmeal Scones


Raisin muffins

DSC03503.JPG

These are what we in the US call “English muffins.”  I don’t make English muffins that often, but I probably should.  They are so delicious!

As you probably know by now, this recipe comes from the amazing Outlander Kitchen Cookbook.  You can find links to all the other recipes I’ve made from this book here.

DSC03489

For this recipe, you will need:

DSC03488

4 cups all-purpose flour, plus more for sprinkling

2 tablespoons sugar

2 teaspoons salt

1 tablespoon yeast

2 tablespoons softened butter

1 3/4 cups whole milk

1 1/4 cups raisins

1 teaspoon vegetable oil for greasing the bowl

2 tablespoons cornmeal for sprinkling

Mix together the flour, sugar, salt and yeast in the bowl of a stand mixer.  Add the butter and stir with the paddle attachment.

DSC03490

Add the milk until the dough comes together into a ball, then switch to the bread hook for five minutes.  My dough was too watery to form a ball, so I added a little more flour.

DSC03492

Add the raisins and knead a little more until they are incorporated.  DSC03493

Oil a large bowl, then transfer the dough to the bowl, coating the dough with the oil.  Cover the bowl with plastic and let rise in a warm place for 60-90 minutes.

DSC03495

On a floured surface, roll out your dough into a 15″ square.

DSC03496

Using a biscuit cutter or cookie cutter, cut out your dough then place each muffin on a parchment-lined baking sheet sprinkled with a mix of cornmeal and flour.  Sprinkle the tops of the muffins with more cornmeal-flour mixture and cover with plastic wrap or a towel for an additional 45-60 minutes.

DSC03497

Meanwhile, heat a cast-iron griddle over medium-low heat.  Sprinkle the griddle with more cornmeal.  Once it is about 350 degrees F, transfer your muffins, a few at a time, to bake for 6 minutes per side.

DSC03500

Pre-flip above; post-flip below.DSC03499
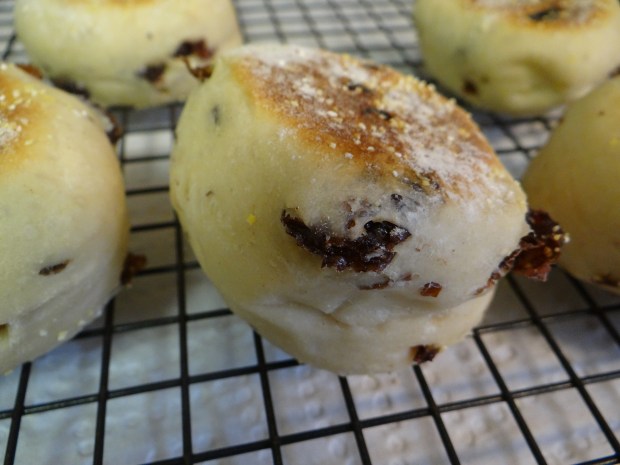
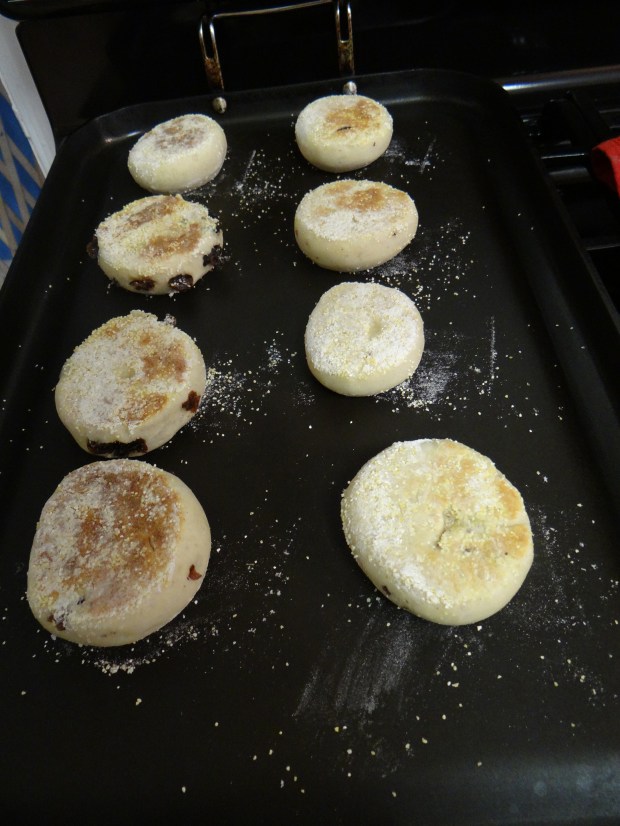
If you have a probe thermometer, remove from the heat when the inside registers 190 degrees F, or when the sides develop a dry, opaque skin.  Let cool 20 minutes on a cooling rack.

DSC03501

These are delicious with honey and butter, but what isn’t?

DSC03502

Baking with kids: Mrs. Bug’s buttermilk drop biscuits

DSC03487

Little Bread Dude, fresh off the success of his honey buttermilk oat bread, asked if he could help cook again today.  I had planned on making the Outlander Kitchen’s raisin muffins, but decided they would take too long for LBD’s attention span (also it was getting close to bedtime).  I picked the buttermilk drop biscuits instead, since the recipe says they’re “tender, southern-style biscuits ready in a flash.”  DSC03477.JPG

For this recipe, you will need:

DSC03476.JPG

1 cup cold buttermilk (or 1 cup cold milk and 1 tablespoon white vinegar)

2 teaspoons honey

1/2 cup (1 stick or 110g) butter, melted

2 cups all-purpose flour

1 tablespoon cornstarch

1 tablespoon baking powder

1 teaspoon kosher salt

1/2 teaspoon baking soda

Preheat the oven to 450 degrees F.  In a medium bowl, mix together the buttermilk, honey and melted butter.  Set aside.DSC03478

In a large bowl, whisk together the flour, cornstarch, baking powder, salt and baking soda. Pour the wet ingredients into the dry ingredients and stir with a spatula  until just mixed and the batter pulls away from the side of the bowl.  My dough didn’t pull away, so I added more flour until it did.DSC03479

Using a lightly greased 1/4 measuring cup, scoop out the dough and drop into a cast iron skillet.  Carle-Sanders suggests three balls in the middle and nine balls around the outside, and this used up all of my dough.  Perfect!

DSC03480

Bake for 15-18 minutes until golden brown.  Remove from the oven and let cool for at least five minutes.

DSC03483DSC03484

These were a success.  Little Bread Dude even tried one.  They are so light and fluffy and easy to pull together.  I’ll definitely be making these again.

Stephen Bonnet’s salted chocolate pretzel balls

DSC03475.JPG

I am so excited to have finally gotten to this recipe, and now that I’ve tasted them, I’m a little sad I didn’t make them sooner!  They are so crazy delicious.

These are from the amazingly awesome Outlander Kitchen Cookbook, by Theresa Carle-Sanders.  I have never been paid by her to promote this book, I just really believe it’s one of the best I’ve ever used.

DSC03457.JPG

For 24 balls, you will need:

2.5 cups all-purpose flour

1 teaspoon kosher salt, plus more for sprinkling

1 1/2 teaspoons instant yeast

1 tablespoon softened butter

3/4 cup warm (not hot) water

7 ounces good chocolate, or 24 hershey’s kisses, rollos, or hershey’s solid milk chocolate eggs.  Or fun size chocolate bars cut into small pieces.  Go nuts.

1 egg

3 tablespoons of baking soda

Combine the flour, salt, yeast and butter in the bowl of a stand mixer. DSC03458.JPG

Add the warm water and stir with the paddle attachment until it comes together in a ball.  Switch to the bread hook and knead on medium for 7 minutes.  The dough should be very firm.  Cover with plastic wrap and let rise in a warm place for 60-90 minutes.DSC03459.JPG

After 90 minutes are up, divide your dough into 24 equal pieces.  It’s best to do this by figuring out the total weight of your dough and dividing it by 24 to figure out the weight of each piece so they are identical, but I didn’t do that.

DSC03463DSC03464DSC03465

For each pretzel ball, flatten it with your hand, then place one chocolate piece in the middle.  If you’re using hershey’s kisses, cut (or bite) off the pointy tip and then set it right-side up in the dough.DSC03467DSC03468

Using your fingers, fold the dough around the chocolate and pinch the ends together at the top.  Place each ball seam-side down, and cover with a towel for 30 minutes.DSC03469

Meanwhile, preheat the oven to 400 degrees F and put a pot of water to boil.  Make an egg wash using your egg and one teaspoon of water.  Cover two baking sheets with parchment paper and get your coarse salt ready.DSC03470

Once your water is boiling, add three tablespoons of baking powder and gently place five or six balls, seam side up, into the water.  Flip them after 30 seconds, then remove them to your parchment-lined baking sheets after 30 more seconds.  Brush each ball with the egg wash then sprinkle with a little salt.DSC03471

Bake the buns for 15-18 minutes.  As you can see, some of mine burst through the seam.  But they’re still ok!

DSC03472

Once you’ve waited the requisite 20 minutes for the molten chocolate to cool down, you can bit into them.  I was honestly shocked at how good these are.  The only ones that were not great were the peppermint/white chocolate hershey kisses. The milk and dark chocolate ones were fantastic.  While not exactly easy to make, they are worth the effort, I promise!

DSC03475

Everyone in the family devoured them, including Little Bread Dude, who is pretty finicky with his sweets.


Sarah Woolam’s Scotch Pies

DSC03456

I went back and forth about making these – on the one hand, they are a baked pastry.  How different could they be from the bridies I’d made just a few days ago?

IMG_4954


But then, faced with a large bag of leftover bridie filling, I decided that the best way to use them up would be to put them into scotch pies.  And who doesn’t love a good way to use leftovers?

IMG_4951

The nice thing about making these with the leftover bridie filling was that I was able to improve on the original bridie filling recipe by pre-cooking it and adding lots of spices like cinnamon, cumin and paprika.

To make these, you will need:

Approximately two cups of your favorite bridie, pasty or empanada filling, or

1 lb minced lamb or beef sirloin

1/4 cup brown beef or chicken stock

1/2 small onion, grated

2 teaspoons Worcestershire sauce

1 teaspoon kosher salt

1/2 teaspoon pepper

1/2 teaspoon grated nutmeg

For the dough, you will need:

3/4 cup butter or lard

1 cup water

4 cups all-purpose flour

1 teaspoon kosher salt

1 large egg

In a large skillet, brown the meat.  Add the onion, stock, Worcestershire sauce, and spices and cook an additional ten minutes.  Set aside.

Measure out the flour and salt and combine in a large bowl.  Meanwhile, heat the lard and water over medium heat until boiling.  Make a well in the flour, and pour in the lard and water.  With a spoon or fork, carefully combine the lard and flour.

DSC03445DSC03446

Pour out the dough onto a floured surface and knead for three minutes until it comes together and is well-incorporated.

DSC03447

Divide it into three pieces, and place two pieces back into the bowl and cover with a towel to keep them warm.

With the third piece, divide it in half and roll one half out to about 1/8 inch thick.  Cut out a large circle of 6 inches and a smaller circle of 4 inches.

DSC03451

Using a mold, carefully fit the large circle into the mold and press down the folds evenly.

DSC03449
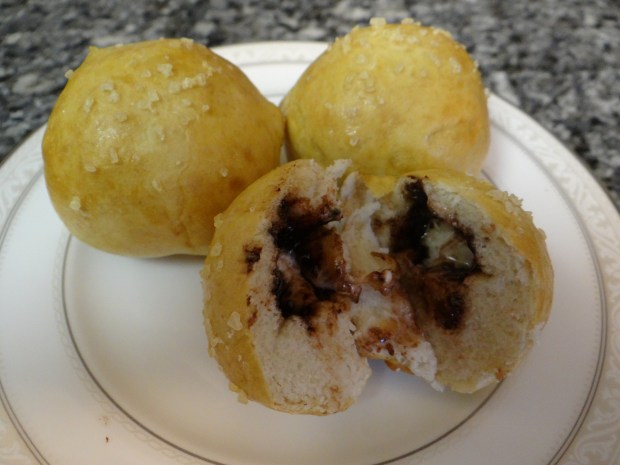
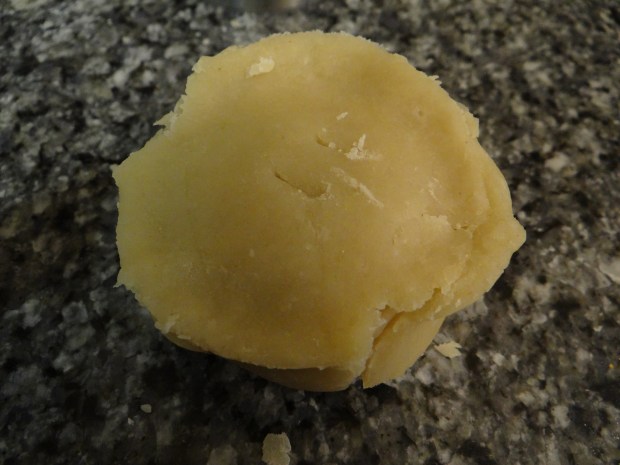
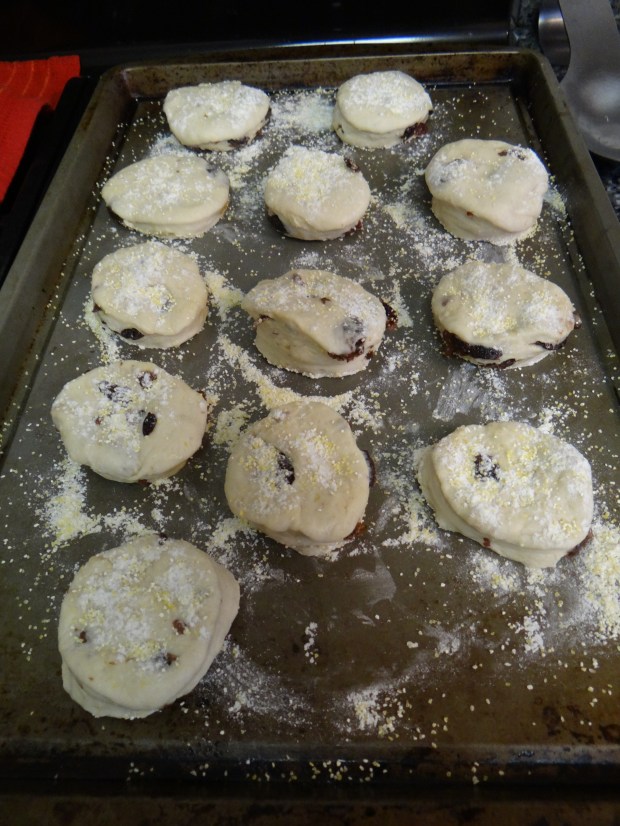
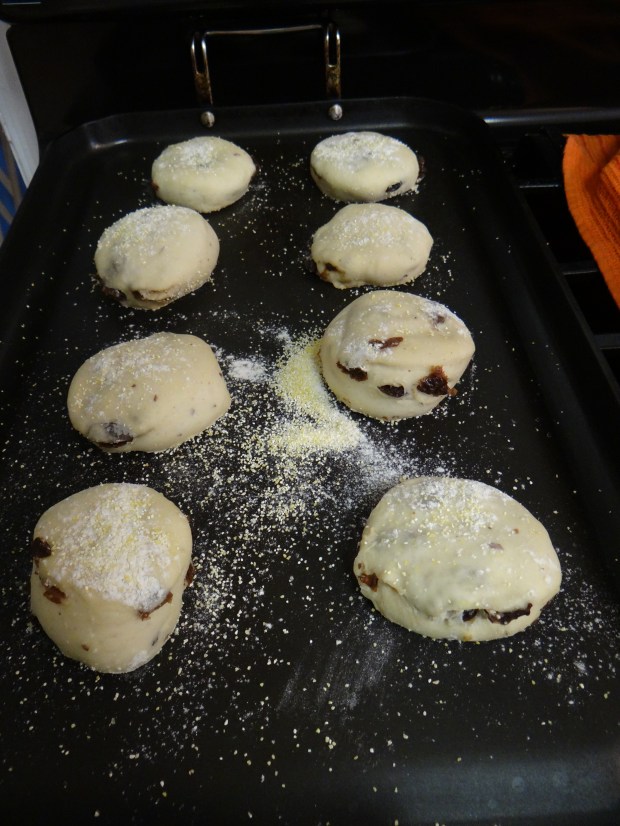
Fill the dough with the filling, and cover it with the smaller circle, pressing down the edges.DSC03450  
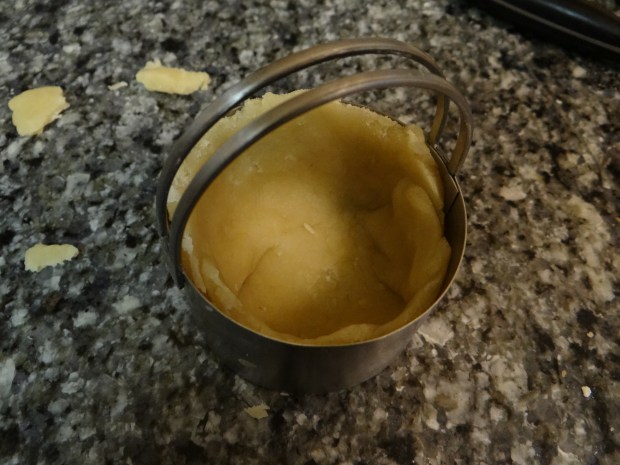
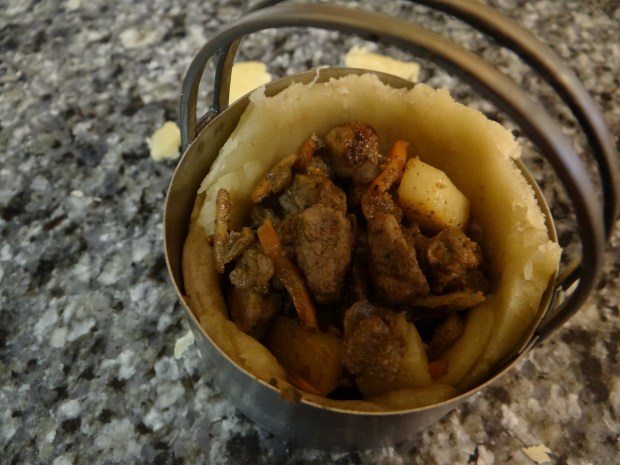
Using your finger or a knife, press down the edges of the pastry against the mold so they are trimmed and even.  Then gently push the pastry out of the mold.

DSC03454

Transfer the pastry to a parchment paper-lined baking sheet and repeat with the rest of the dough to make six total pastries.  Using a sharp knife, cut two small vent holes in the top of each pastry. Refrigerate the pastries for 30 minutes.

DSC03448

Preheat the oven to 400 degrees F; brush the pastries with egg wash and bake for 35-45 minutes.

DSC03456

These aren’t as pretty as the picture in the cookbook, but they smell delicious!  I think it was the right call to cook the filling and season it first.

Jocasta’s Auld Country Bannocks

DSC03443

This is recipe ten from the Outlander Kitchen Cookbook.  After the success of the other bannock recipe, I was excited to try this one.  There were a few hiccups, but in the end I think they came out ok.

DSC03435

For this recipe, you will need:

DSC03436

1/4 cup whole milk

2 tablespoons butter or lard (or bacon drippings!)

1/2 teaspoon kosher salt

1 cup coarsley ground rolled oats or pearled barley

whole wheat flour for rolling

Combine the milk, butter and salt in a small saucepan and heat over medium until the butter melts.

DSC03438

Grind the oats or pearl barley (note: the pearl barley takes way longer to grind than the oats, FYI) and pour them in a large bowl.

DSC03437

Form a well in the ground oats and pour in the milk and butter.  Stir to form a slightly sticky dough.  If it does not form a dough, add whole wheat flour until it comes together and pulls away from the bowl.

DSC03439

Transfer the dough to a floured surface and knead a few times, then roll out the dough into an 8-inch circle, about 1/4 inch thick.

DSC03440

Over medium-low heat, let a cast-iron skillet warm up.  Slice the dough into six to eight pieces and place them in the skillet.  DSC03441

After five minutes, give them a flip.  Some of my pieces required an additional five minutes to cook through.

DSC03442

These were… pretty bland.  Kind of the same issue as the oatcakes.  I tried to jazz them up with honey, with butter, with cheese, pimento cheese spread, and with meat.  Little Bread Dude liked them with honey.  Mr. Bread Maiden, after returning from a run, inhaled the final few slices plain and with cheese.

I’m not sure I’ll make these again, but I’m glad I did try them.